There are many ways to cast or mirror your Oculus Quest 2 unto other devices such as smartphone, PC’s, and TVs. With smartphones, you can cast. With PCs you can cast, use Link Cable, or Air Link. For TVs, the options are a lot more.
The well-known ways to cast Quest 2 to TV are casting to phone and mirroring to TV, casting directly to TVs that have inbuilt Chromecast, using Chromecast device, or using a third-party casting app like AirScreen.
However, users also want to know if it’s possible to connect Oculus Quest to their TV using a direct cable connection. Please read on to find out if this is possible, the challenges you may face, the workarounds, and the alternatives to connecting Quest 2 to your TV using a cable.
Can You Cast Oculus Quest 2 to TV With Cable
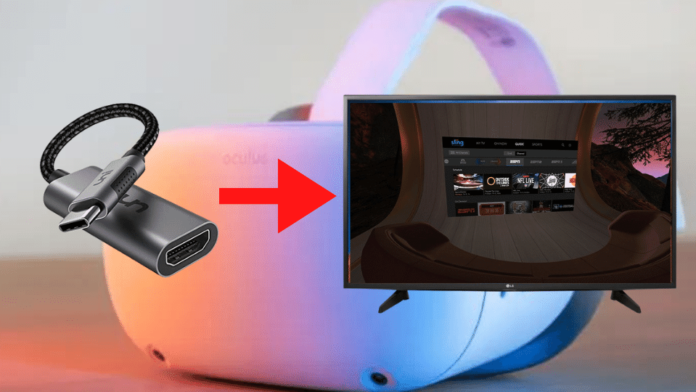
First of all, it is important to note that Quest 2 technically and officially only supports casting Oculus directly to a TV using wireless technology. The only connectivity port on your Quest 2 is a USB-C port.
To transfer digital data from this USB-C port to a TV, you can only use an HDMI cable. USB to USB cannot transfer data to your TV. And you cannot connect an ethernet cable to your Quest 2…not that your TV would support such data transfer anyway.
So, you are left with using a USB-C to HDMI connection to connect Quest 2 to your TV. However, your Quest 2 headset does not natively support HDMI data transfer because it does not have video output.
This is somewhat similar to trying to connect your Android phone to a TV using HDMI cable. For that, you would need a phone that has Mobile High-Definition Link (MHL) support or SlimPort (microUSB to HDMI).
Quest 2 and Android phones are built on the same OS platform, so they face the same challenges when it comes to connecting to the TV; more so with Quest 2 which does not have MHL support. It is built solely for either USB or wireless data transfer.
Oculus (Meta) have recently stated that Quest 2 will accept HDMI video but a PC has to be between the headset and your TV to support such casting.
So, even though you can cast Quest 2 to TV with cable, the lack of native support for HDMI output on Quest 2 may make the experience not worthwhile.
How to Cast Oculus Quest 2 to TV With Cable
1. USB-C to HDMI Cable
The only way to cast Oculus Quest 2 to TV using a cable is to use a USB-C to HDMI cable as explained earlier. However, please note that because Quest 2 does not have MHL or direct HDMI video support, there will be issues using this method.
To cast Quest 2 to TV using USB-C to HDMI cable, please follow the steps below:
1. Purchase a long USB-C to HDMI cable (view on Amazon). The standard in the market is 6ft but you should go for 15ft cables for better experience.
2. Turn on your Quest 2 headset and your TV
3. Make sure they are connected to the same WIFI network
4. Connect the USB-C end to your Quest 2 headset and the HDMI end to an HDMI port on your TV
5. Press the input button on your TV remote control and select the HDMI port connected
6. Strap on your headset and press the Oculus button the right controller
7. Select Share
8. Select Cast
9. At Cast To, select your TV and select Start
If you want to use the Oculus app on your phone to set up the casting:
1. Turn on your Quest 2 headset and your TV
2. Make sure your headset, TV, and phone are connected to the same WIFI network
3. Connect the USB-C end to your Quest 2 headset and the HDMI end to an HDMI port on your TV
4. Press the input button on your TV remote control and select the HDMI port connected
5. Open the Oculus app on your phone and tap the Cast icon
6. Under Cast From, select your Quest 2 headset
7. Under Cast to, select your TV
8. Select Start to start casting
9. Strap on your headset and accept the casting permission request
Your Quest 2 should now start casting to your TV.
Can You Cast Oculus Quest 2 to TV Using Link Cable
You may be wondering if the Oculus Link Cable can work for casting to TV as well. The short answer is, No. You see, Link Cable is a USB-C to USB-C or USB-A port setup. And this works only on the PC USB port. For cable on TV, video can only be cast using HDMI.
To use Link Cable for TV, you would need to connect your PC to Quest 2 using Link Cable, and then mirror your PC on your TV screen. The bottom line is that Link Cable only works for connecting Quest 2 to PC.
How to Cast Quest 2 to PC vs Using Link Cable
If the terms get a bit confusing, here is the difference between casting Quest 2 to PC and using Link Cable to connect Quest 2 to PC
1. You can cast Quest 2 to PC using the cast feature on Quest 2. What this means is that you are playing on your headset but your game is being displayed on your PC for others to view
2. For Link Cable, you connect your Quest 2 to your PC and then play on your PC. You only need to have your Quest 2 turned on but not strapped on your head. All the controls and display are now on the PC.
This second method is what Link Cable is meant for. And your TV obviously does not have the capabilities for playing and controlling virtual reality games unlike your PC. That’s why you cannot use Link Cable to cast Quest 2 to TV.
Challenges You May Face When Connecting Quest 2 to TV using Cable
1. Quest 2 Reboot
One of the most common challenges users face when connecting Quest 2 to TV using a cable is that the headset restarts on every connection. It is not clear why this happens, but it seems to be an attempt reinitialize the video output software on Quest 2. This experience is common among users.
2. Poor Rendering Experience
Another issue that you are likely to face with this setup is poor audio and video quality, as well as lag in display. This is because support for USB to video is very poor on Quest 2.
When you use Link Cable for PC, you would notice that the graphics are much better because the headset is taking advantage of the PC graphics capabilities to render the game.
Since Quest 2 does not support this kind of integration with TV, it has to send its own video data through the cable…and the USB-C to HDMI cable is just not good enough for such high-speed, large data transfer.
3. Glitching
The last known issue with connecting Quest 2 to TV using cable is glitching. It manifests in several, different ways such as:
- Flickering on the screen and complete breaking of the connection
- Headset stops responding
- Serious lag in rendering from the headset to the TV
- No audio on the TV
- TV showing Oculus Quest 2 but video not playing
Better Alternatives
Even if you do manage to get this setup to work for you, the lack of native support for it means that you are forcing your Quest 2 to do something it isn’t programmed to do. Apart from the inconvenience of the challenges, you may also be causing damage to your headset in the long run.
As such, we advise that you look for better and supported alternatives to casting Quest 2 to your TV, and we have listed a few below:
1. Use Chromecast
Several smart TVs today come with inbuilt Chromecast, including Sharp, Sony, Visio, TCL, Toshiba, Philips, Polaroid, Skyworth, and Soniq. It may well be that your TV has inbuilt Chromecast. Method to check for this feature depends on your TV brand.
For example, to check for inbuilt Chromecast on Sony TV:
1. Press the Home button on your remote control
2. Select Settings
3. Select Apps
4. Select See All Apps
5. Select Show System Apps
6. Check for Google Chromecast built-in
7. Or, from Apps, you may see Google Chromecast Built-in
If your TV does not have inbuilt Chromecast like Samsung and LG TVs, you would need to purchase a Chromecast device and set it up. Please follow the steps below to set up Chromecast on your TV:
On Android:
1. Plug the Chromecast HDMI cable into the HDMI port on your TV
2. Plug the USB cable into the charging dock of your Chromecast, and connect the charging dock to a wall socket
3. Turn on your TV and select the HDMI input source
4. Download the Google Home app onto your smartphone
5. Sign in with your Google account and complete the prompts
6. Then, go to the Home screen of the Google Home app and click the plus icon +
7. Select Set Up Device
8. Select New Device. The app will search for your Chromecast device.
9. Select your WIFI SSID and enter the password if prompted. You need to ensure that you enter the details of the same WIFI that your smartphone and TV are connected to
On iOS:
1. Plug the Chromecast HDMI cable into the HDMI port on your TV
2. Plug the USB cable into the charging dock of your Chromecast, and connect the charging dock to a wall socket
3. Turn on your TV and select the HDMI input source
4. Download the Google Home app onto your smartphone
5. Sign in with your Google account and complete the prompts
6. Enable Bluetooth for the setup process (this is recommended by Google)
7. Or, reject Bluetooth prompt, open the WIFI settings on your iPhone and connect to the network that bears ChromecastXXXX or so in its name.
8. Open the Google Home app and follow the prompt to add your Chromecast device.
9. If you are not prompted to do so, tap the Add+ icon, select Set Up Device, then select New Device
10. Complete the steps to set up Chromecast on your iPhone
After setting up Chromecast on your TV, follow the steps below to cast to your TV through Chromecast:
1. Strap on your headset and press the Oculus button to open the universal menu
2. Select Share
3. Select Cast
4. From the list of devices, select your Chromecast device
5. Select Start to start casting
2. Cast to Your Phone, Then Mirror on TV
Another way to cast from Quest 2 to your TV if the TV does not have inbuilt Chromecast is to cast Quest 2 to your phone, then mirror your phone to your TV. The setup for this may vary across TV brands, but we will present a general guide.
For Samsung TV, SmartThings makes this a lot easier. Please follow these steps to cast Quest 2 to your phone then mirror to your Samsung TV:
First, cast Oculus Quest 2 to your iPhone
1. Turn on your Quest 2 headset
2. Ensure that your Quest 2 is connected to the same WIFI as your phone
3. Open the Oculus app on your phone
4. Select the icon with a headset and WIFI signal together. It is at the top right of your screen
5. Under Cast From, select your Quest 2 headset.
6. Ensure that the status of the headset is Connected
7. Under Cast To, select This Phone
8. Select Start at the bottom of your screen
9. Put on your headset and accept the permission to start casting to your phone
Then cast your phone to your Samsung TV using SmartThings
1. Ensure that your Samsung TV and your phone are up to date
2. Download the SmartThings app to your phone (Android and iOS)
3. Make sure that your phone and TV are connected to the same WIFI
4. Open the SmartThings app on your smartphone
5. Click the Devices tab
6. Select Add Device
7. Sign in to your Samsung account if prompted
8. After signing in, you should be redirected to the app
9. It should list the devices available
10. Select your Samsung TV
11. Tap the 3 dots at the top right of your screen
12. Select Mirror Screen
13. Select Start Now
For other TVs that support screen mirroring, you could use the inbuilt screen mirroring app on your phone to mirror your screen on your TV. We recommended using SmartThings for Samsung TV because of the superior performance it offers.
Casting Oculus to TV with HDMI Cable Not Working? Try These Fixes
There aren’t many reasons why casting Oculus Quest 2 to TV with HDMI should work in the first place. It is not an officially-supported model and is fraught with issues when it does work.
However, this method of casting has worked for some users. So, if you are trying to set it up and it’s not working, here are some of the key reasons why this may be so.
1. Devices Not On Same Network
The most important requirement for casting Quest 2 to your TV or to any device is that all the connected devices have to be connected to the same network.
Even though you are using a direct HDMI cable to connect your TV to Quest 2, casting the Quest 2 content from Oculus unto your TV requires that both devices remain connected to the same network throughout the casting.
You could easily check what network your devices are connected to by going to the network settings.
For Quest 2:
1. Strap on your Quest 2 headset and turn it on
2. Press the Oculus button on your right controller
3. At the bottom of the screen in quick settings, select the WIFI icon
4. The network you are connected to will display in the WIFI bar
For your TV, open the settings menu, select Network, select WIFI to see the WIFI you are connected to.
2. Substandard or Faulty USB-C to HDMI Cable
Remember that this setup is not normally supported by Quest 2. For it to work, you have to use a high-quality USB-C to HDMI cable with 4K support, and able to transmit data at very high speeds. Also, it is better to use longer cables as this enhances the quality of data transfer. However, do not use cables more than 40ft long.
3. WIFI Issues
There are two aspects to the WIFI issues that could make connecting Quest 2 to TV using cable to not work.
1. Poor WIFI Signals: Apart from being connected to the same WIFI network, both devices need to have strong WIFI connection for the casting to work. Quest 2 and your TV should both be within 30ft of the WIFI router, with unhindered line of sight, and no other devices streaming at the time
2. Poor Internet: First of all, ensure that your router is connected to the internet and has a strong connection. Use your PC to stream videos and test the connection. If internet is poor:
- Unplug the router
- Wait 2 minutes
- Plug it back in and retry
If the issue persists, contact your ISP.
4. TV or Oculus Out of Date
The final thing to check when troubleshooting the issue of Quest 2 to TV with cable not working, is whether the two devices are up to date.
Updating your devices increases the possibility of their having the capabilities and support need to make this setup work. It also ensures that bugs that may be causing the connection problem are eliminated.
To update Oculus Quest 2:
1. Make sure your headset is fully charged
2. Press the Oculus button on your right controller
3. Select Quick Settings
4. Select Settings
5. Select System
6. Select Software Update and select Update Now
7. Then confirm to Install Update
The method to update your TV depends on your TV brand. But generally, you will find it in
- Settings>Support
or
- Settings >About
or
- Help>Status and Diagnostics
Or you could just google the update method for your TV.
If you have got all the above 4 factors sorted and the connection still does not work, you may use the alternatives that we presented in this article.