
Are you in a situation where your microphone volume is too low? Does your friend on the other end keep asking you to speak up? You are desperately in need of a way to increase your microphone’s volume on Android, and it just so happens you’ll find a said solution here.
Since Android is void of any microphone settings, you’ll have to turn to software to make it work. You know, an app. After all, there’s an app for everything, right? What you need is an app that can amplify your voice.
If you’re having microphone issues on your Samsung device, you first need to figure out if this is a hardware or software related problem. To help find the issue, we have a few simple tips.
Is It A Hardware or Software Issue
1. Try removing all accessories.
2. Turn off your Bluetooth headset or earbuds, and if they’re plugged into your device, unplug it.
3. Next, unplug your charger if it is connected and then turn off Bluetooth. (If the microphone in question is an external device and not your phones, keep the connected device on.)
4. Then, turn off your mobile device and turn it back on. When it starts back up, try recording some audio. Your phone should have a built-in audio recording app, like Voice Recorder.
5. Make sure your ringer and volume is on, then play the audio. If you hear nothing, this means it is probably a hardware issue.
You will need to visit a cell phone repair shop to have your device looked at by an authorized technician.
If you do hear faint or quiet audio, good news; there is a high chance you can fix your phone yourself by trying these possible solutions.
How to Increase Microphone Volume on Android
1. With Microphone Amplifier
1. Download and install Microphone Amplifier (Android). Visit the Google Play Store and search for “Microphone Amplifier.” Select it from the search results and tap Install.
Note: It’s developed by Mobile Apps Studio.
2. Now launch the Microphone Amplifier app. It’s app icon is orange with the iconic Droid logo stamped in black.
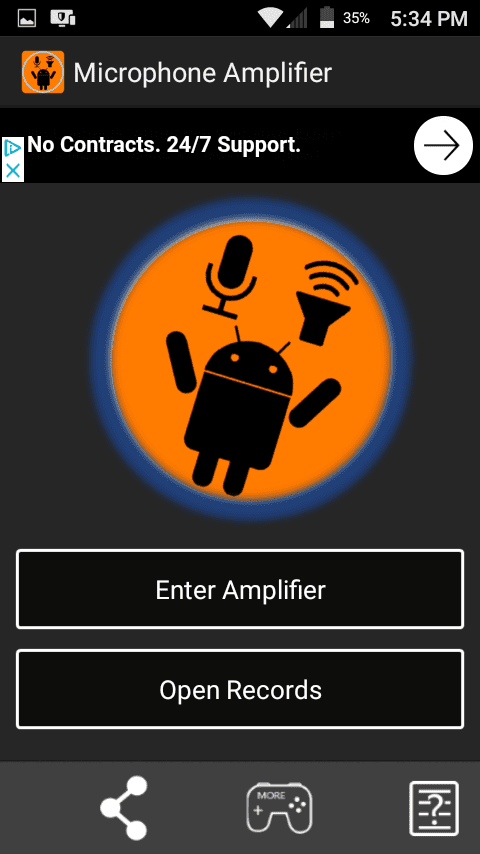
3. Once the app is opened, start by tapping Enter Amplifier.
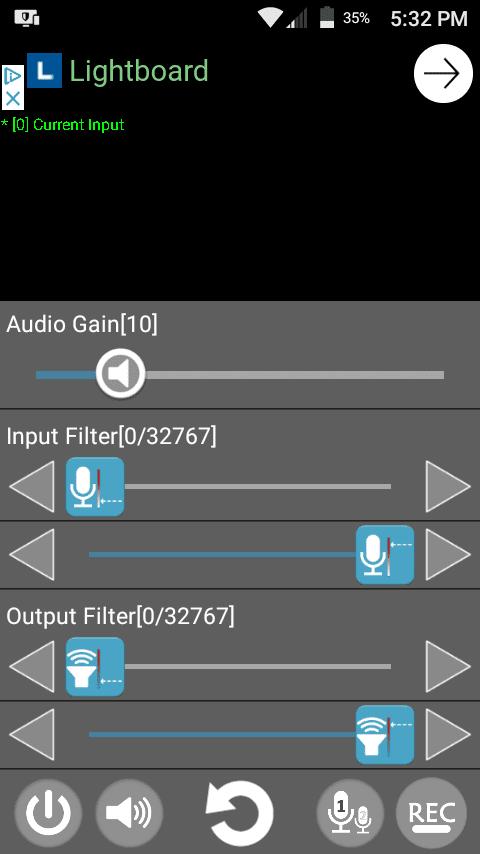
4. The first slider, the Audio Gain slider, is your first (and only) target. This will increase the volume of your voice.
Note: Be careful with how much gain you add. The more gain added, the worse the sound quality gets. Somewhere between 10 to 20 is good, but play around with it to see what works for you.

5. In the bottom left corner you’ll see the power icon. Tap on it. In doing so, Microphone Amplifier will apply the settings you’ve made.
Note: To test your new settings, record your voice with your settings enabled. You want your voice to be clear. If there’s too much static, try reducing the gain in small increments. And don’t forget to practice good mic placement. Keep the mic about 2 to 3 inches away from your mouth.
6. To disable the filter Microphone Amplifier added, tap the power icon again.
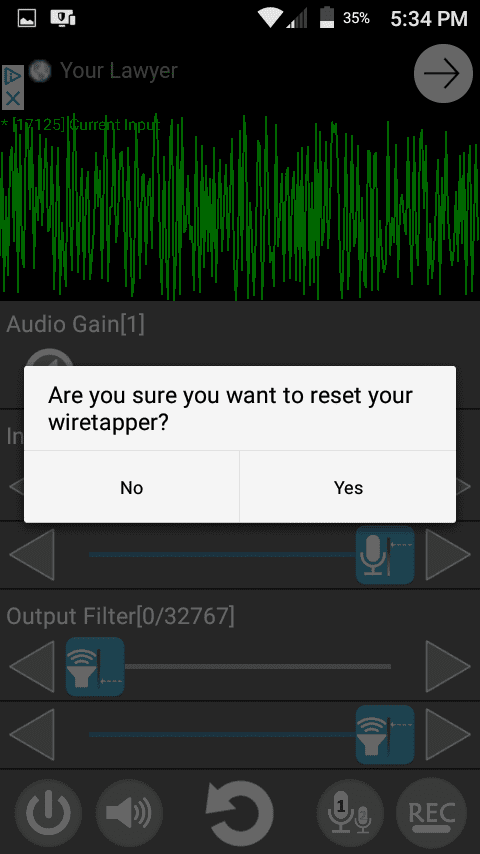
7. To reset your settings, tap the Reset icon at the bottom—the arrow chasing its tail. When prompted to confirm, tap Yes.
2. Buy A Louder External Mic
If you’re using an external mic and people are struggling to hear you because the mic is so quiet, or your recordings are low volume due to the mic being quiet, then you’ll need to buy an external mic that has a louder mic such as the Galaxy Buds Pro (view on Amazon).
3. Speak Louder into Mic
If your microphone still sounds quiet or muffled, try speaking louder into your microphone. You should be able to see the sound waves in the app ‘Microphone Amplifier’. If the audio waves are bigger this means your microphone is, in fact, picking up more audio. If this didn’t work, try our next possible solution;
4. Speak Closer to Mic
While this may seem obvious, it can be an effective way to test and diagnose the problems your microphone is having. You can try blowing or talking loudly into the microphone to see if the audio waves peak. If they don’t, there may be something inside your microphone, like dust or crumbs.
5. Blow Compressed Air in the Microphones
Blowing compressed air into your microphone could help with your issue; there could be something on or inside your microphone blocking sound from going into the microphone. You can easily find a can of Compressed air online; they are very inexpensive so this could very well be a better option than just buying a louder microphone.
6. Check For Blocked Openings
If you’ve already tried blowing compressed air into your mic and the problem still resides, you could try looking for anything stuck or blocking the microphone.
Use a flashlight and closely examine the mic in question and use a small tool, like a paperclip or wooden tooth pick to scrape out anything you see.
You could also try cleaning your microphone using a q-tip damp with 99% Isopropyl alcohol (view on Amazon).
Isopropyl alcohol is mostly non-conductive, meaning it will not break your microphone or any other electronic – as long as you don’t use too much. Be extra careful while doing this!
7. Give Apps Microphone Access
You may have accidentally pressed ‘Deny’ when your application asked for microphone access, or it may be using a different mic than intended; to fix this, make sure the app you’re using has access to your microphone by following these steps.
1. Go to ‘Settings’.
2. Press ‘Apps’ or ‘Installed Applications’.
3. Select the App you want to use your microphone.
4. Tap ‘Permissions’ in ‘App Info’.
5. Allow access to ‘Microphone’, ‘Phone’, and ‘Camera’.
Your application now has access to your microphone. If the issue persists, there is another type of problem with your microphone or software.
8. Restart your Android Device
There could be a software glitch or issue that is declining the use of your microphone for any reason. Sometimes, trying something as simple as just restarting your android device can fix the issue.
9. Reset All Settings
You may have accidentally turned on a setting affecting your microphones quality, or some other setting you turned on somehow indirectly caused your issue. If this is the case, resetting all your applied settings will fix the problem. Here’s how you go about this;
1. Go to ‘Settings’ from your device’s homepage.
2. Locate ‘General management’. This should be down towards the bottom of the settings page.
3. Tap ‘Reset all settings’. Remember, this is not a factory reset. All of your apps, pictures and videos will remain on your device.
4. Press the ‘Reset settings’ button.
5. Type your password or passcode and press next.
6. Again, press ‘Reset’.
7. Your phone will restart and all of your settings and cache will be restored to default.
If the issue was a software problem with your phone or settings, the problem should be fixed as soon as your phone is turned back on.
10. Turn Off Bixby Voice
Bixby Voice is sometimes prone to bugs or issues with your microphone. If you don’t want to turn off Bixby Voice, we recommend at least turning it off and back on.
1. Swipe down on the screen to bring up the notifications menu and press the power icon on the top right of your screen.
2. You should see the power menu pop up on the screen. Tap ‘Side key settings’ located at the very bottom of the power menu.
3. You should now see the ‘Double press’ and ‘Press and hold’ settings. Under ‘Press and hold’ select ‘Power off menu’ instead of ‘Wake Bixby”.
11. Restart your device
Now, when you press and hold the power button, the power menu will come up instead of Bixby. If this did not fix the issue, feel free to turn Bixby back on by going back to the ‘Wake Bixby’ setting.
12. Turn Off Noise Reduction
Noise Reduction may be on by default in either your devices settings or the app settings. The purpose of this feature is to block out your microphone from picking up unwanted background noise, however it may sometimes do you more harm than good. We recommend to try turning this feature off with these simple steps.
1. Go to the ‘Phone’ app that your device came with.
2. Tap ‘Menu’ located at the bottom of your screen.
3. Tap ‘Call settings’ and then ‘Additional settings’ at the bottom.
4. Locate and uncheck Noise reduction.
And that’s it! Noise reduction will now always be off unless you choose to turn it back on.
13. Disable a Third-party App That Could Cause Problems With Mic
If you’ve downloaded any third-party apps that made changes to your microphone’s settings, you could try to uninstall these apps or turn off mic permissions in your settings. Here’s how to turn off mic permissions.
1. Go to ‘Settings’.
2. Tap ‘Privacy’ located towards the bottom.
3. Go to ‘App permissions’
4. Press ‘Microphone’.
5. Any app listed with a green switch has mic permissions. To turn them off, tap the switch. It will now be grey, meaning these apps do not have access to your microphone.
Record another audio sample to see if your microphones quality has improved or changed.
Still Having Issues?
If you implemented some of the solutions above and are still running into low microphone volume, the issue may rest with the microphone itself. There’s a few troubleshooting steps you can take to ensure the microphone isn’t the problem.
Double-check Sound Settings
You may have placed your device on silent or Do-Not-Disturb. Use the volume buttons on the side of your Android device to remove it from silent mode.
Additionally, external microphones come with a Mute button. Make sure it hasn’t been enabled. Also, some microphones come with a volume wheel that controls the volume of your voice on the other end of the call.
Clean Your Microphone
Dirt, lint, dust—all manner of blockage—is capable of preventing your voice from being picked up fully by your microphone. Imagine trying to talk to someone behind a wall, and you’ll understand how a wall of debris can block sound from reaching your microphone.
With a thin object, something like a sewing needle, safety pin or better yet, a wooden toothpick can be inserted into the microphone. Gently insert the object and, in a circular motion, break free any lint or dirt that may be trapped inside.
Use Another Microphone
You might be dealing with a microphone that has shorted. Are they old? Perhaps the wires are disconnected on the inside. Did you get them wet at some point? Either way, any damage your microphone has experienced may have killed them for good.
Try using them on a different device or switch them out with another microphone and see if the second pair works. If they do, your first pair are likely damaged.
Turn Off Noice Reduction
Another feature that you can do to increase the volume of your microphone is to use the noise reduction feature. The noise reduction feature is there to remove any background noise that can interfere with the performance of your microphone.
To turn off noise reduction:
- Open the Settings menu.
- Tap Call Settings.
- Look for the Noise Reduction option. If you cannot find it, you can use the search function to search Noise Reduction. If you can’t find it, it’s probably because your Android doesn’t have this feature.
- Tap the toggle switch to disable Noise Reduction.
- Restart your phone and see if the problem is fixed.
Check For An Update
There could be a bug in your os that’s preventing your microphone from functioning properly. The best thing to do in this case is to check for an update. Updates are there to get rid of bugs and this can make the volume of your microphone louder.
Updating your Android:
- Make sure your device is connected to Wi-Fi.
- Open Settings.
- Select About Phone.
- Tap Check for Updates. If an update is available, an Update button will appear. Tap it.
- Install. Depending on the OS, you’ll see Install Now, Reboot and install, or Install System Software. Tap it.
Disable Third-party App
Sometimes a third-party app could be the culprit of your microphone being so quiet. If you think this is the case, then you can, you can deny that app access to your microphone. Use the following steps to deny microphone permissions for any apps that don’t need to use your microphone:
- Open the Settings app.
- Tap Apps
- Select the menu icon
- Select App Permissions or Permissions Manager.
- Select Microphone or Microphone Permissions.
- Select the app that you think is causing a problem with your microphone.
- Tap Deny to deny it microphone access.
Factory Reset Phone
As a last resort, you can factory reset your device. If the problem is software related, this is almost guaranteed to fix the issue, though all of your phone’s data will be wiped clean, including your pictures and videos, apps, contacts, and messages.
Your phone will be reset to the way it was when it was first shipped out of the factory. If you’d like to do this, follow these 4 simple steps.
1. Go to ‘Settings’ from your device’s homepage.
2. Locate and press ‘Backup and reset’. This should be down towards the bottom of the settings page.
3. The last option on the bottom of your screen should be Factory data reset. Scroll all the way down and press ‘Reset phone’. Remember, all your data will be wiped off the phone. Type in your PIN or password. It may take a while, but when it’s complete the device will restart with everything wiped back to how it was when you first got the device.
Send Feedback to Manufacturer About the Problem
It is recommended to send feedback to the manufacturer of either the phones microphone or the external microphone in question. This can prevent others from going through the same thing you did, and if you have warranty, they may replace your device.
Bottom Line
From additional software to native options, there’s plenty of ways to increase your microphone’s volume on Android devices—Microphone Amplifier isn’t the only app available on the Google Play Store.
It can be incredibly helpful if you have a microphone that, even at full volume, still isn’t loud enough. And on top of that, the options above may just save you a trip to the nearest electronics store.