
In your camera roll on your iPhone, you may have noticed a small circled exclamation point at the bottom right of each photo. These photos can appear blurry and they can take a long time to load in order for the picture to appear normally.
Why Is There An Exclamation Point On My Photos?
The exclamation mark at the bottom of your photos indicates that the photo or video is compressed. If you also see that your photos and videos take time to load and appear blurry when you first open them, your iPhone has compressed your camera roll/ Without this compression enabled, it means that your photos and videos are stored at lower resolutions so you’ll have to wait for the exclamation mark to load for the photos to show a normal resolution.
Your iPhone is storing a compressed version of your photos because of a feature called Optimize iPhone Storage. This feature aims to save storage on your iPhone by only storing a compressed version of your photos in your camera roll and getting rid of the original on your device.
When this feature is enabled, your iPhone stops storing your original photos and videos, and the original version is stored in iCloud and it’s replaced with a light compressed to save storage. So to show you that this feature is on, an exclamation mark will be displayed in the bottom right of your photos and this will disappear when the photo finishes loading.
How to Get Rid of Exclamation Mark on Photos iPhone
To get rid of the exclamation mark at the bottom right of your photos, you’ll need to turn off the Optimize iPhone Storage. Turning off Optimize iPhone storage means that your iPhone will download and keep all of your original photos and videos rather than storing a compressed version that takes time to load.
Sometimes the Optimize iPhone Storage feature can be turned on automatically, or you have no choice than to turn it on because there isn’t much storage on your iPhone. Rather than turning off the feature just to get rid of the exclamation mark , you need to make that your iPhone has enough storage so that you don’t need to turn this feature on in the first place.
1. Download and Keep Originals
When you enable Download and keep originals, it goes into iCloud and restores all of the original photos and videos so that when you open them in your camera, they don’t need to be loaded so the exclamation point won’t be there. As soon as you open your photos in your camera roll, they’ll appear in the same quality that you took them.
- Go to Settings.
- Click on Photos.

- Select Download and Keep Originals.
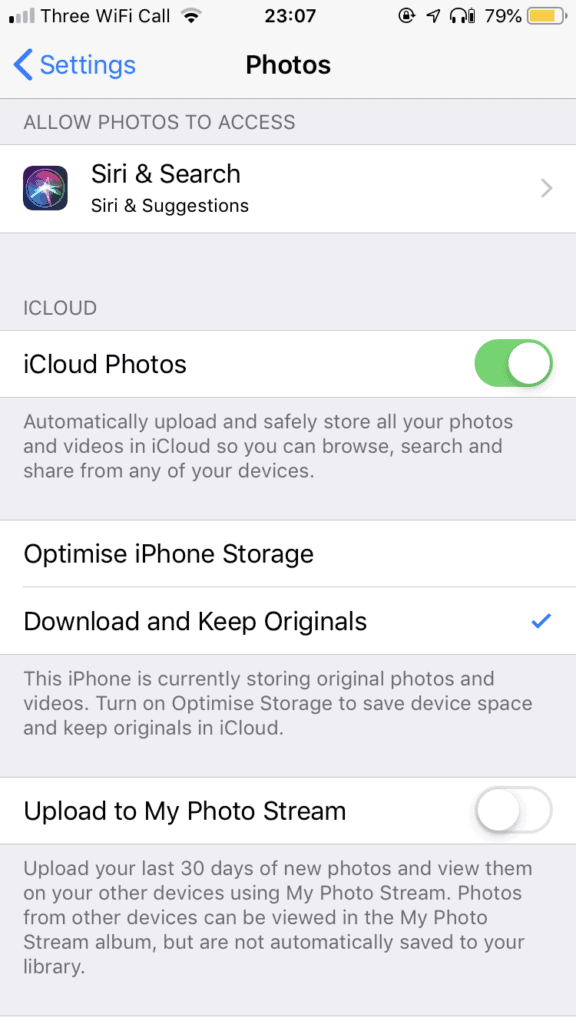
This will restore the original versions of the photos and videos on your camera roll and this is a decompressed version. Once this is done, the exclamation mark at the bottom of the photos should have gone.
When your device connects to WIFI again, your iPhone with sync with your iCloud and downloads all the original versions.
2. Turn Off iCloud Photos
Another thing you can do if this didn’t work is to turn off iCloud Photos. iCloud photos automatically upload and safely stores all of your photos and videos in iCloud so that you can browse, search and share from any of your iOS devices.
- Go to Settings
- Click on Photos
- Toggle off iCloud Photos. After a while, all of your photos will be removed from your camera roll. All of the photos won’t be the original version, they will be compressed. Since these compressed photos aren’t originals, they will be wiped from your camera roll while the original version stays in iCloud.
- Wait for your Camera roll to be wiped.
- Turn your iPhone off
- Go to Photos. This is in Settings.
- Select Download and Keep Originals.
Once you’ve done this, your device will sync up with iCloud and download your original photos and videos once connected to WI-FI and when your device is inactive for a long period of time.
3. Make Storage Space
If you don’t recall turning on Optimize iPhone Storage, you probably didn’t. When your iPhone is running out of storage, this feature will be turned on automatically so that your device can make more storage space in order for it to function.

To make more storage space, you can offload some apps. When you offload apps, their data and cache files are deleted from your device but their APK isn’t. This means that the app is left on your iPhone and it’s just left for you to click it in order to install it.
Another way to save some storage is to delete iMessage’s older than 30 days. Your messages are correctly saved forever so this means they are taking up a lot of storage if you text a lot.
- Go to Settings.
- Tap on Messages.
- Click on Keep Messages and tap on 30 Days.
From now on, when each message has been there for 30 days, it’s going to be deleted automatically. This is going to remain like this until you put it back on forever.
If you have loads of photos and videos especially, deleting these could get rid of a lot of space on your iPhone without you having to delete apps or iMessage. You need to make sure that you get rid of all the photos and videos that are useless. Once you’ve done this, your device should have a lot more storage so you don’t need to turn off the optimized iPhone Storage feature. This means that your iPhone has enough storage to operate on and you can now see your photos in your camera roll without the exclamation mark being there.
4. Wait for The Exclamation Mark to Disappear
If you want to leave the optimize storage feature on, you can get rid of the exclamation mark inside the circle by waiting for the photo to load. The only reason for the exclamation point is that the photo is loading. Once the photo has done loading, it’ll will be gone and you wouldn’t see it in the bottom right-hand corner anymore.
5. View Your Original Photos In iCloud
Rather than going on your camera roll to view a compressed version of your photos, you can visit iCloud to see the high res version. If you werent able to turn off the optimize storage feature and you want to view your original photos rather than a blurry version with an exclamation point, then you’ll need to visit iCloud.com.
To view your photos without the exclamation point:
1. Open a browser on your computer and go to iCloud.com.
2. Authorize the 2-factor authentication and enter the pin shown on your device.
3. Click on Photos you should be able to view your photos. Download the ones you want to your computer.
From here, you can view all of your downloaded photos on your computer. These photos will be the original version and not an optimized version so they won’t have an exclamation point in the corner. If you have a USB, you can transfer the high res photos to your iPhone.
6. Restart your iPhone
Restarting your iPhone will refresh the software it’s running on. If there’s a bug or glitch, then restarting your iPhone may get rid of it which could fix the problem you’re experiencing.
7. Force Close Photos App
Since photos are showing the exclamation point in the Photos app and that’s where the problem is arising from, force closing the Photos app might get rid of the issue and cause the photos to show normally. To force close the Photos app, you need to open the multitasking view by swiping up from the bottom of your screen, then closing the app by swiping the Photos app up.
8. Convert Your Photo into Compatible Format
If the images that you’re trying to see in your camera roll have been downloaded from a website and not been taken by the native camera, then they may not be supported by your iPhone. You will never get these photos to load without the exclamation mark because your iPhone just doesn’t have the capacity to load them.
Rather than wasting your time trying to load them without the exclamation mark, you can convert the photos into formats that your iPhone is able to show normally. There are tons of photo converters that’ll allow you to convert foreign photo’s into formats your iPhone can load which is HEIC. such as mov m4v, and mp4. Once you’ve converted the photo, try viewing them again in your camera roll again.
9. Check and Repair Corrupt Photo
There’s a chance that the image is corrupt. Although you shot it from your iPhone, there’s still a chance that it could be corrupt. There’s a higher chance of it being corrupt if the photo was downloaded from email or shared via a chat.
If you want to be able to view a corrupt photo, you’ll need to transfer the photo from iPhone to a computer and repair them using phot repair software, such as Stellar Repair for photo.
It can fix corrupt photo files on iPhone in only a few steps and this will allow you to transfer the photo back to your camera roll and you’ll be able to see it without the exclamation point.
10. Force Restart Photos App
Another problem that can cause your photos to show an exclamation mark is a problem with your iPhone. If there’s a software problem within your iPhone that’s stopping your photos from loading with the exclamation mark, then you’ll need to refresh the software – this can be with a force restart.
For iPhone 8 or Later:
Quickly press-release the volume up button, then press-release the volume down button in quick succession. Once done, press-hold the sleep/wake button until the Apple logo appears on the screen.
For iPhone 7 & 7 Plus:
Press-hold the sleep/wake button with the volume down button for at least 7-10 seconds. Do not release them until the Apple logo appears on the screen.
For iPhone 6 Plus & Previous Models:
Press-hold the home and side/top button (as per the model) for 10 seconds. Do not release them until the Apple logo appears on the screen.
11. Restart Internet Connection
If there’s a problem with your internet connection, you’ll need to fix it. If you typically have a weak source of internet, for example, slow WIFI, then this may be a frequent occurrence. You need to make sure that you turn your WIFI off then on, or switch to data. Once you’ve done this, you can visit the Photos app again to see if photos load normally. If they’re still blurring, you can put this down to something else.
12. Reset Network Settings
The next thing that you should do to try and get rid of any glitches that could be causing the exclamation mark in the camera roll is to reset network settings.
To wipe all settings:
- From the home screen, tap Settings
- Scroll down to, then tap General
- Scroll down to, then tap Reset
- Tap Reset Network Settings
- Tap Reset Network Settings to confirm
- After doing this, go back to your camera roll and see if you’re able to see the exclamation mark. If not, the problem is fixed.
13. DFU Restore Your Device
The next thing you need to do in this situation is to restore your phone from DFU mode. This is the last step an Apple tech will take when there’s a hardware or software issue going on within your device.
The problem you’re experiencing is persisting then restoring from DFU mode is the best way to try and get the software to refresh and get rid of whatever glitch is causing the problem.
When you put your device in DFU mode and restore it, it’s going to wipe all of the code off the device, update the firmware, and put the code back on. During this process, you’re going to lose all of your data, so you do need to back up your iOS device.
14. Factory Reset
A factory reset will be needed if a force restart doesn’t work. A factory reset involves wiping your device clean and restoring it back to its normal settings. For this to work, you’ll need to be willing to lose all of your data in the process, but if it’s backed up, then you’ll get it back. There are two ways to factory reset your iPhone but the easier way is through the settings app.
To revert to factory settings:
- Open Settings.
- Select General.
- Go to Reset and choose to Erase All Content and Settings
- You will be prompted to backup your data at this point. Tap Back Up Then Erase.
- Enter your passcode to confirm the factory reset. Once you have entered the passcode and hit OK, then your iPhone will start erasing.
- Once the reset is complete, then check to see if your camera roll is showing photos without the exclamation mark.
15. Contact Apple Support
If you have tried all the steps and photos still are still showing the exclamation mark, then it looks like there’s a deeper issue that can’t be resolved with troubleshooting steps. In this case, you’ll need to contact Apple support to get this fixed. You can speak to their live chat via the Apple Support website.